Hannah Nielsen » Documentary Family Photographer Seattle Portland and Worldwide

Masthead header

Yesterday I talked about the exposure triangle.  Understanding the elements that create your exposure is critical to understanding your camera settings, so if you missed that post or still feel confused, go back and read it again or shoot me an email with questions.

Earlier today I posted a poll on Facebook asking “Which camera mode do you use most often?”  The result was not surprising.  Besides my professional photographer friends, almost everyone is either shooting in auto or one of the other ones that have a little picture (the mountain, the face, the party hat, etc.).  The explanation below will probably only be helpful to those of you who are using a DSLR, as I honestly don’t know much about the modes on point and shoot cameras.

For simplicity’s sake, I’m only going to talk about the 5 main camera modes today:  Auto, P, TV, AV, and M.  Some cameras have another mode or two mixed in and on many you can also create custom settings, but we won’t get into that.

Auto – the auto mode on your camera is just what it sounds like.  It adjusts everything for you.  It meters your scene and does it’s best to choose the correct exposure at that moment.  The biggest problems with auto are that it doesn’t know what you’re shooting, and it doesn’t know what in your image is important to you.   It will evaluate the entire scene and make the best selection for the whole thing even if that isn’t necessarily the best exposure for your subject.  It might fire the flash, whether you want it or not.  I might mis-understand the type of image you’re trying to capture and get completely “confused”.  Using auto on a better camera is going to give you better images, yes, but wait until you see what happens when you really take the time to understand your camera.

P – Program – the program mode is similar to auto in that it controls your shutter speed and aperture for you.  You have a little more control in that you can tell the camera whether or not to fire the flash, and also choose the ISO.  Cameras all seem to have a slightly different P mode, so check your manual to determine exactly what it allows you to do on your camera.

TV – Shutter Priority – Shutter priority mode allows you to choose your shutter speed, but still chooses all of your other elements for you in order to get a correct exposure.  If you remember from yesterday, shutter speed determines how much motion is captured in your images.  I use TV mode when I want to shoot sports or other fast action.  I can set my shutter speed to faster and ensure that I’m going to capture every bit of motion no matter what the lighting is or what the other settings need to be.

AV – Aperture Priority – Aperture priority is similar to shutter priority in that you choose one of the three elements and the rest are chosen for you.  This time, as you may have guessed, you get to choose your aperture (which, as you remember, determines your depth of field).  I’ll use AV when I know I have a background that isn’t that pretty, and I want to draw attention to the person I’m shooting.  I’ll set my aperture very wide and focus on the person which will blur out the background and make the subject really pop.   With AV mode you have to be aware that your shutter speed is staying above 1/125 if you want to be sure to freeze motion.  The camera will choose the aperture, but in order to keep the aperture you want, has to adjust the rest of the elements accordingly.  It doesn’t care if you want to freeze motion or blur it if you’re telling it that the most important element is the aperture.

M – Manual – Manual mode, as you’ve probably guessed, allows you to choose every element yourself.  This is hands down the best way to learn and understand exposure, as well as to make sure that you’re getting the most accurate exposure possible.  It also allows you to maneuver trickier lighting situations.  I very highly recommend learning to shoot in manual first.  Just spend some time with your camera at a time that the images don’t matter.  Play withe ISO, shutter speed, and aperture until you understand the relationship. Once you get that, using the rest of the modes is SO easy, and you know when you need to switch back to manual and take control.

I know this is a lot of information.  I highly recommend the book Understanding Exposure by Brian Peterson if you want to dive in a little bit deeper.  If you pick up your camera every day and just try to learn it a little bit better, you’re going to get better.  If you get confused, READ YOUR MANUAL.  I can’t say it enough.  Read your manual, read your manual, read your manual!!!  It tells you everything you need to know.  Then if you get confused by your manual, and I’m not kidding here, Google it.  The internet is full of killer tutorials and you can learn photography on line (Trust me.  I know!).  I know it can all seem intimidating, but I promise you that by taking one step at a time, realizing you’re not in a rush, and just enjoying the process, you’re gonna kill it.

Happy shooting!

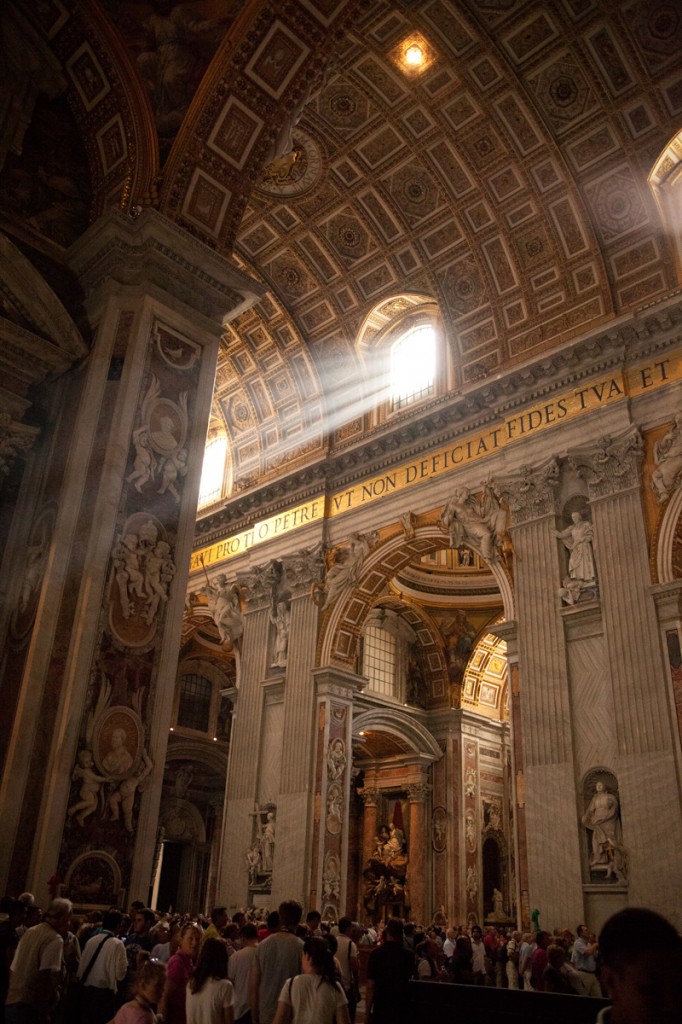
Oh, and just for fun, because a post isn’t a post without an image, here’s a shot I took on our honeymoon in Italy.  St. Peter’s Basilica had some amazing light floating around…and I just love amazing light.  It just makes me happy.

PIN

Share:|Facebook|Twitter|Pinterest
  • April 4, 2012 - 2:07 pm

    Aria Clements - I vow to spend at least half the time I’m using my camera in Missouri in manual. 🙂

    The AV part made me remember a picture I took on my iPhone. The background had the motion, but my daughter was clear, like the exact opposite of a subject deciding to run off. Do you have any idea how that happened, or how to recreate it with a DSLR?ReplyCancel

    • April 4, 2012 - 2:14 pm

      Hannah - I would think that you were moving with her and the background was moving in a different direction. 🙂 Like if you’re on a merry-go-round and you’re sitting opposite of someone you’ll get them in focus because you will be staying the same distance away from them, but the background will blur with the motion. Does that make sense?ReplyCancel

  • June 24, 2012 - 11:16 am

    Erin Lindsey - I definitely just pinned this post and the one before it to my bookmark bar. Thank you for the handy guide. I loved my photography classes in college, but right now my DSLR feels like greek.ReplyCancel

    • June 24, 2012 - 3:34 pm

      Hannah - I’m so glad you’re finding them helpful! And thanks for pinning! Let me know if you have any questions 🙂ReplyCancel

I had a request from the lovely Aria of Aria Couture for a run down on camera settings.  The next two posts are for those of you who have a good camera, but know you’re wasting your investment by not using the settings it allows you.  As always, if you have any questions please feel free to ask!  Let’s jump right in.

To understand your settings you need to first have a basic understanding of exposure.  I’ll start with that today and move on to camera settings tomorrow.  Exposure is determined by three things: ISO, shutter speed, aperture (otherwise known as the exposure triangle).  Here’s the most simple explanation of each I can come up with.

ISO – how sensitive the camera is to light.  If you’re in a darker room you can set your ISO high so that it’s sensitivity is higher and therefore less light is required to get your exposure correct.  In the bright outdoors, you can set your ISO low.  High might be somewhere around 1600 and low might be 100.  In Seattle I generally start at 200 and work from there since we get bright skies, but not full on sun most of the time.

Shutter speed – how quickly or slowly the shutter opens and closes (and therefore, how much light is let in).  The numbers correlate to seconds.  1/1600th of a second, 1/250th of a second, 1/60th of a second, etc.  The shutter is literally opening up for that amount of time.  So 1/1600th of a second is obviously a much faster shutter speed than 1/60th of a second.  Your shutter speed also determines how much motion is captured in your images.   If you leave your shutter open, the camera captures everything that happens while it is open.  In the first image below the shutter speed was very slow which is why you don’t see the girl walking by, but her movement.  A fast shutter speed freezes motion like in the second shot below.  If you don’t want to have any motion blur (or want to freeze motion) you’ll want to choose a shutter speed faster than 1/125th of a second as a general rule, but this is also determined by focal length and camera shake which we won’t get into today.  If you’re experiencing motion blur and don’t want it, use a faster shutter speed (this is how you get a shot of someone jumping when they’re in mid-air).  If you want the blur, slow it down.

PIN

Aperture – how wide the iris of the lens opens (This works just like your eye!). When you go into a darker room, your iris gets wider, letting more light in so that you can see.  When you go out into the sun, it closes down so that you’re not blinded.)  Aperture also determines, in some part, your depth of field.  When you shoot wide open your depth of field is very narrow and everything in front of or behind your focus point will be out of focus.  For example, this image was shot wide open at 2.8.  The couple and everything on the same plane as them is in focus. You can see pretty clearly how the scaffolding behind them starts to fall more and more out of focus.  You can also see that closer to the camera on the right the scaffolding is out of focus as well.  The second image below was also shot wide open.  Notice how I’m closer to the couple, and in this case she is in my focus plane.  He is slightly in front of it, and therefore out of focus.  Everything behind them has blurred out. (I just love backgrounds like that!)  The smaller the aperture (f1.2, f2.8, etc.) the wider open you are shooting and therefore the narrower your depth of field.  The larger the number (f16, f22, etc.), the more closed down you are shooting and the broader your depth of field (as in the 3rd image below).   This confused me a lot at first because the numbers don’t seem to match the opening of the iris, but once I started mentally relating them to the depth of field it cleared right up.  The smaller the number, the smaller the depth of field.

PIN

All three of these factors equally affect the exposure.  If you have a correct exposure (not too bright, not too dark) and you change one of these settings you will have to change another to get your exposure correct again.  Play with it.  Watch what your images look like when you change one thing or another or both or all three.  The best way to understand how ISO, shutter speed, and aperture affect your images is to try it!

Happy shooting!


Share:|Facebook|Twitter|Pinterest
  • April 4, 2012 - 2:01 pm

    Aria Clements - “This confused me a lot at first because the numbers don’t seem to match the opening of the iris, but once I started mentally relating them to the depth of field it cleared right up.”

    THANK YOU!! This is what confused me most!

    I majorly screwed up some photos I took and didn’t realize it until the ensemble had been shipped. They came out washed out. How can you tell if the ISO is too high? What is the benefit to a lower ISO instead of a faster shutter speed? I think the aperture relates less to a good picture when it comes to a photo being too dark or overexposed, right? Is there some trick to figuring out ISO and shutter?

    You are awesome for this!!ReplyCancel

    • April 4, 2012 - 2:38 pm

      Hannah - If your ISO is too high it will become too sensitive to light and you’ll overexpose your image (too bright).

      Generally, you want to use the lowest ISO possible. The higher ISO you use, the more grain you will start to get (not really noticeable until higher ISOs in the 1600+ range depending on your camera…although when I shot with an XSi I experienced some grain as low as 800). However, when I say the lowest ISO possible, I mean the lowest you can shoot while still accomplishing what you want to. If you have to bump it to get the shutter speed or aperture you want or need, by all means!

      As a basic rule (like back in the film days when you just had to choose an ISO and stick with it for a whole roll) you want to set your ISO at 100 for a super bright (like full on sun) day, 200 for overcast, 400 for indoors but not dark and on up. I generally set my ISO and don’t really mess with it until there’s a drastic change in lighting, or I’m unable to get a shot I really want without tweaking it. I’d definitely suggest trying that when you first start messing with manual. (And yaaaay that you’re going to give manual some attention while you’re in Missouri! Would love to see some of your images!)

      Tweaking any of the three elements can lead to over or underexposure. If you’re aperture is too wide, in too bright of a lighting situation, with too high of an ISO, you will overexpose. The good news about it being the exposure triangle is that you can fix, say, your ISO, you can get the correct exposure without changing anything else. Or you can choose to keep your ISO and change something else to get the right exposure depending on what is important to you in that particular image. So maybe you’re already at a shutter speed of 1/125, and you really hate your background so you want a wide aperture, then you’d choose to change your ISO…but if the background is not so bad and you’re worried about hitting the point where you’d get grain on your camera, then you can close down your aperture instead. Does that make sense?

      Here’s a test you could do that might help explain it. Try to shoot the same exact shot (same place, same subject, same light) at each ISO…So start with 100, adjust your other settings until the little line is right in the middle on your meter when you look through the camera. Then bump your ISO to 200 and do it again. Write down your settings and see how they relate. Also, when you do this exercise, put the images on your computer and look at them. Make a mental note of where your camera starts showing you grain in your images.

      Did I just give you homework??? 🙂

      Let me know if there are more questions!ReplyCancel

I started photographing Penelope when she was just a bump in her mama’s tummy.

PIN

A few weeks ago, she turned 1!  She and her family were a joy to work with over the last year and it was so much fun to watch Penelope grow.  Here’s just a taste of her most recent shoot.

Happy birthday, Penelope!

PIN PIN


And, hey, she’s turnin’ 1! Let her eat cake!

PIN

Share:|Facebook|Twitter|Pinterest

I officially have 26 minutes to come up with a blog post worth posting.  Remember, I said no fluff posts, right?  I didn’t post yesterday (stay tuned for a guest post :)).  My sister was in town and we went to a beer festival and just spent some time together…but she went home today and there’s no excuse for me not to write.  But here I am at 11:34 thinking about how sometimes it feels like you have nothing to say.  I’ve got a whole list of blog post ideas.  “Important” things to tell you, images to share, ideas to put out into the world…but sometimes nothing seems worthy of the time and space it takes up in someone’s life.

We are constantly surrounded by input (as I’ve mentioned in previous posts).  Facebook, Twitter, blogs, emails, books, commercials, music, tv, billboards, pop up ads, junk mail, it never stops.  The things we choose to put our time into need to have function in our lives.  Meaning.  I choose to keep up with Facebook for a few reasons:  I’m totally social and can’t imagine “missing something” by not being interactive on the biggest social networking site.  I also think Facebook is made for photographers.  It is the perfect way to share our work with clients and their friends and family.  It serves so many purposes.  It also wastes hours of my life.  Each input I choose is for a reason.  Whether the reason is social, business oriented, or emotional, each of my inputs is tied in tight to what is important to me.   Some inputs are actually important, while others are tied to unhealthy habits.  (Do I really need to play my games of Draw Something before I get out of bed in the morning?)

I know I’m rambling.  My point is this:  choose your inputs wisely.  There are only so many years in our lives, days in our years, hours in our days.  We only get so much time and we only get to choose once how we want to use it.  And if you’re not sure if something is worth your time, seriously consider it.  I have made a choice in the last several months to cut the things that aren’t so important. My tv input is down a million percent if there is such a thing.  I read more.  I listen to good music and read inspiring blogs.  My magazines are sitting in a giant stack next to the couch waiting to be read.  I’m focusing in on the things that have value in my life.

And if you spend five minutes of your day reading my blog posts, I thank you for your attention.  I know you have the choice to be here or not.  I value you and your readership.  Thank you for being here.  I want this blog to be an interaction.  Yes, I’m talking to you, but it’s not a one way road.  Comment, email me.  Keep the conversation going.  Because as important as choosing your input is balancing your output.  And for me, this output is only worth it if it’s meaningful to someone else too.

I’ve made it with 3 minutes to spare.  A blog post I can get behind.  Input.  Output.  Make your choices for a reason.  Until tomorrow…

A little preview…

PIN

Share:|Facebook|Twitter|Pinterest

PIN

My sister, Katie, is here to visit today.  She’s a teacher and it’s her spring break.  When I told her I needed to take a little while to write a blog post before we go to see the Hunger Games, she called me a dork.  So I’m a dork…so is she!  Which is why we decided we should work together on this blog post…interview style.   Here goes…

Katie: Can I really ask you anything I want?

Hannah: Anything. Except remember all of the embarrassing things I know about you and choose your questions carefully.

Katie:  Haha okay, okay…Why photography?

Hannah:  Photography kind of found me.  I wanted to be a photographer when I was 14, but life got in the way.  High school, college, moving to Seattle.   Photography was on the back burner to say the least.  But 4 years ago in the middle of feeling my most lost, photography grabbed me and shook me.  It absolutely floors me that people are willing to show me their love, their true selves.  I feel so blessed to be able to witness it every day.  The best part?  Everyone loves differently.  Every single couple or family I’ve shot has had their own unique way of loving each other…and how lucky am I that for an hour or two of their lives, they’ll share that with me?

Katie:  What was your first shoot?  What did you learn from it?

Hannah:  My first official shoot was a 1 year old’s birthday party.  I felt out of my element, totally in over my head, and SO EXCITED!  I learned that you can never be too prepared, you don’t need several hundred shots of the breaking of a pinata, and candids give you a chance to catch real expressions.  Oh, and that 1 year old birthday parties, while fun, are not necessarily my thing.

Katie:  So what is “your thing”?  What does a typical shoot look like for you?

Hannah: Couples.  I absolutely adore shooting couples: engagement sessions, actual engagements, anniversaries, just for fun shoots…weddings too.  Couples give me the freedom to be creative and find the best light and locations, but still capture true emotions.  What does a shoot look like?  I usually start by explaining that it won’t be a “normal” shoot.  I don’t pose my couples.  I very rarely even ask them to look at the camera.  I ask them to give me a chance, just relax, and try to go with the flow.  I also ask them to trust me.  I explain that sometimes they might feel a little silly, but I promise that everything I ask them to do is for a reason.  Then we start with some lighthearted games.  I ask them questions about each other.  I have them be silly right away.  After they’ve let down that guard and we’ve spent some time laughing together, it’s much easier to capture the meaningful serious moments as well.  Almost every shoot ends with moments where the couple forgets I’m even there and just spends those few seconds with one another.  The biggest compliment in the world to me is when the guy leaves saying, “That was so much fun!”

Katie:  What do you look for when setting up a shoot?

Hannah: Authenticity, light, location (in that order).  I look for couples who above all else, want beautiful images that capture them being them.  Authenticity in their interactions with one another and my interactions with them give us the absolute best images I can create.  Light makes me happy.  I adore the “golden hour” right before sunset when everything has kind of a magical feeling to it.  (It makes people look extra gorgeous too!)  The wrong or bad light can take so much away from the images.  Location…a good photographer can make pretty much anywhere work with the right clients and the right light…but if I had my pick (and I’m so lucky that most of the time my clients trust me enough that I do!), I’d choose somewhere natural.  Tall grass, the beach, trees, flowers, nothing to manicured.  I love a little bit of wildness to my locations.

Katie:  Who is your ideal client?

Hannah: I look for couples who are willing to be open with me and with each other.  Couples who want to relax, be themselves, be silly, be serious, try whatever, play.  Couples who really want to spend this hour or two enjoying each other’s company.   The actual look of the client doesn’t matter so much to me.  Age, race, orientation?  Also doesn’t matter.  Any two people who really love each other are my ideal client.  I absolutely love working with couples in love.

Katie: What if your clients don’t give you that emotion you’re looking for?

Hannah: Honestly, I haven’t had that happen yet.  Probably because I don’t look for any emotion specifically.  Once my clients are interacting with each other, I just look for their genuine emotions.  Whatever they’re feeling they show and that’s the emotion I’m looking for.

Katie:  How do you get new ideas?

Hannah:  Pinterest, movies, other photographers, collaborating, a specific location or style can spin off into a whole shoot…mostly Pinterest.  I’m kidding.  Mostly.

Katie:  What inspires you?

Hannah:  Can I say Pinterest again?  Okay, seriously…people who put everything into what they love, textures, color palettes, beautiful light, great books, singer-songwriters, my clients.

Katie: How many Starburst Jelly Beans have you eaten in the course of this interview?

Hannah: I think it’s better that we don’t talk about that.

Katie: Do we get to go see the Hunger Games now?

Hannah: Yep.  Just one more jelly bean.


Share:|Facebook|Twitter|Pinterest
  • March 31, 2012 - 6:17 pm

    Anne Moore - mama loves you both!ReplyCancel